Ever wondered how you can use a Raspberry Pi to set up your very own Virtual Private Cloud (VPC) network? Well, you're in the right place! In this article, we'll dive deep into Raspberry Pi VPC network examples and show you step-by-step how to create a secure and efficient cloud environment using this tiny but powerful device. Whether you're a tech enthusiast or just starting out, this guide will give you all the tools you need to get started.
Let's face it—cloud computing is no longer just for big corporations. With tools like Raspberry Pi, anyone can set up their own VPC network from the comfort of their home. But before we jump into the nitty-gritty, let's break down what a VPC network really is. A VPC, or Virtual Private Cloud, is essentially a private cloud environment where you can run your applications and store your data securely. It's like having your own mini data center, except it's way cheaper and easier to manage.
Now, why would you want to use a Raspberry Pi for this? Well, the Raspberry Pi is not just a fun little gadget; it's also an incredibly versatile device that can handle tasks ranging from simple home automation to complex server setups. By the end of this guide, you'll see just how powerful this little board can be when it comes to creating your own Raspberry Pi VPC network example.
Read also:Poop Smells Like Weed Why It Happens And What You Can Do About It
What Exactly is a Raspberry Pi VPC Network?
Alright, let's get down to business. A Raspberry Pi VPC network is essentially a private cloud setup that uses the Raspberry Pi as its main server. Think of it like a mini data center in your living room. You can host websites, run applications, store files, and even set up your own private network—all on a device that fits in the palm of your hand.
Why Use Raspberry Pi for VPC?
Here's the deal: Raspberry Pi is not just cheap; it's also incredibly energy-efficient. You can run it 24/7 without worrying about skyrocketing electricity bills. Plus, it's super easy to set up, even for beginners. If you're looking for a cost-effective way to set up a VPC network, the Raspberry Pi is hands-down the best option out there.
Here are some key reasons why Raspberry Pi is perfect for VPC:
- Low cost—Raspberry Pi boards are super affordable.
- Energy-efficient—uses minimal power compared to traditional servers.
- Compact size—fits anywhere, making it ideal for home setups.
- Highly customizable—you can tweak it to fit your exact needs.
Getting Started with Raspberry Pi VPC Setup
Before we jump into the Raspberry Pi VPC network example, let's talk about what you need to get started. Don't worry; it's not as complicated as it sounds. With just a few basic tools and some patience, you'll be up and running in no time.
Hardware Requirements
First things first, you'll need the following hardware:
- Raspberry Pi board (preferably Raspberry Pi 4 for better performance).
- MicroSD card (at least 16GB, but 32GB or more is recommended).
- Power supply (official Raspberry Pi power adapter is highly recommended).
- Ethernet cable (optional, but useful for stable internet connection).
- USB keyboard and mouse (for initial setup).
- HDMI monitor or TV (again, only for initial setup).
Software Requirements
Now that you've got the hardware sorted, let's talk about the software. You'll need:
Read also:Jose Menendez Autopsy The Untold Truth Behind The Infamous Case
- Raspberry Pi OS (the official operating system for Raspberry Pi).
- SSH client (like PuTTY for Windows users).
- Network configuration tools (we'll cover these in detail later).
Step-by-Step Guide to Setting Up Raspberry Pi VPC Network Example
Ready to roll up your sleeves and get started? Great! Here's a step-by-step guide to setting up your very own Raspberry Pi VPC network:
Step 1: Install Raspberry Pi OS
The first step is to install the Raspberry Pi OS on your microSD card. This is the operating system that will run on your Raspberry Pi. You can download the OS from the official Raspberry Pi website and use a tool like Balena Etcher to flash it onto your microSD card.
Step 2: Configure Network Settings
Once you've installed the OS, it's time to configure your network settings. You'll need to set up a static IP address for your Raspberry Pi so that it remains consistent in your network. This is crucial for setting up a VPC network.
Step 3: Enable SSH
SSH, or Secure Shell, is a protocol that allows you to remotely access your Raspberry Pi. You'll need to enable SSH so that you can manage your VPC network from any device on your network.
Step 4: Set Up Firewall Rules
Security is key when setting up a VPC network. You'll want to set up firewall rules to ensure that only authorized devices can access your network. This will help protect your data and applications from unauthorized access.
Step 5: Install and Configure VPC Software
Now comes the fun part—installing and configuring the VPC software. There are several options available, but one of the most popular is OpenVPN. OpenVPN allows you to create a secure tunnel between your Raspberry Pi and other devices on your network.
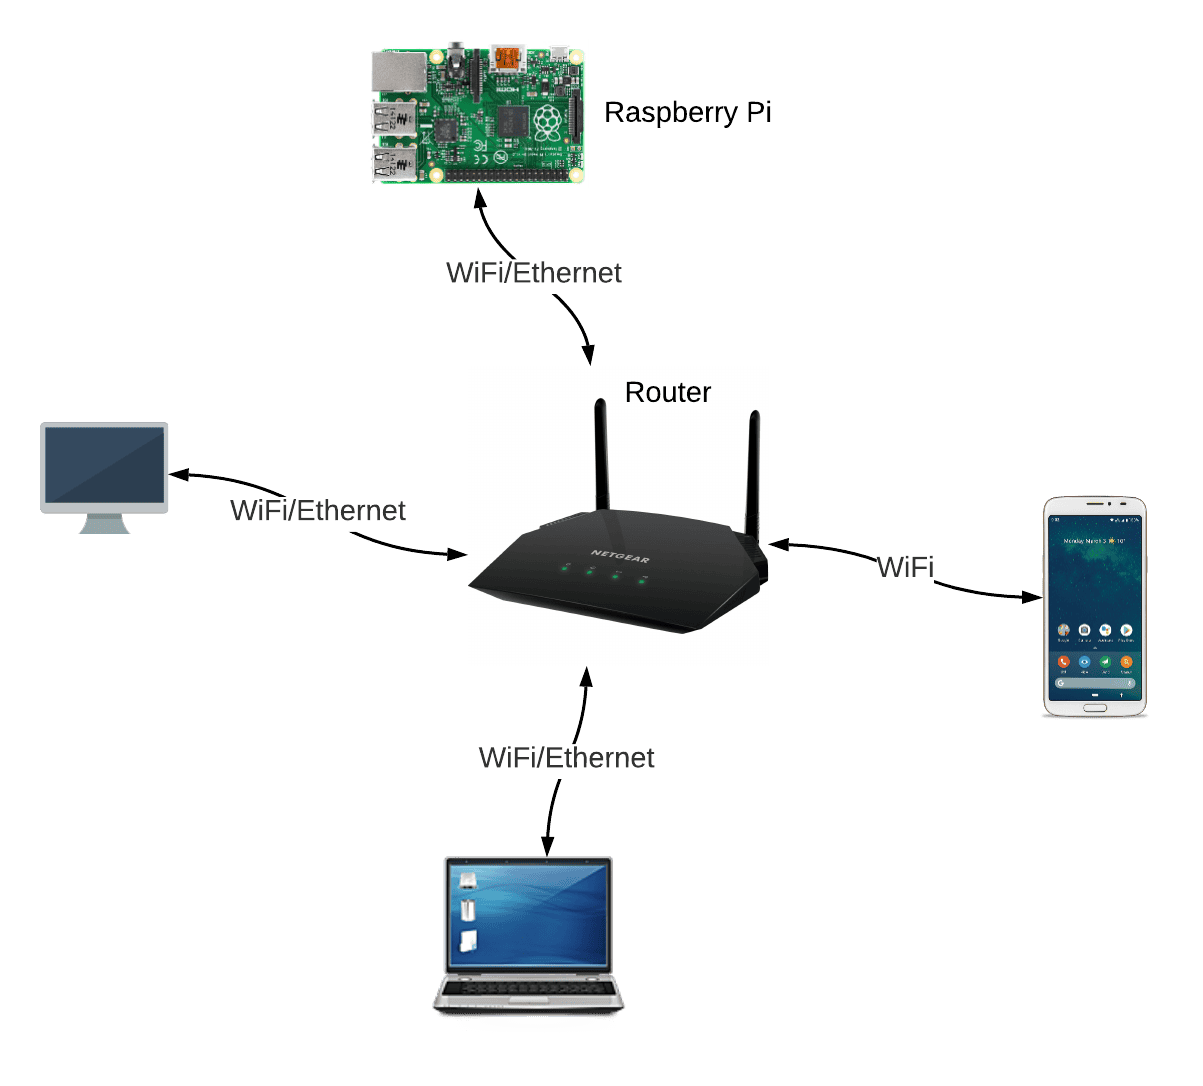
Understanding VPC Network Architecture
Let's take a moment to understand the architecture behind a Raspberry Pi VPC network. Essentially, your Raspberry Pi acts as the central hub for your VPC network. All devices on your network connect to the Raspberry Pi, which then routes traffic securely through the VPC.
Key Components of a VPC Network
Here are some of the key components you'll need to understand:
- Subnets: These are smaller networks within your VPC network. You can use subnets to organize your devices and applications.
- Security Groups: These act like virtual firewalls for your VPC network. They control inbound and outbound traffic to your devices.
- Route Tables: These determine how traffic is routed within your VPC network.
Common Challenges and How to Overcome Them
Setting up a Raspberry Pi VPC network isn't always smooth sailing. Here are some common challenges you might face and how to overcome them:
Challenge 1: Connectivity Issues
One of the most common issues is connectivity problems. If your Raspberry Pi can't connect to your network, double-check your network settings and ensure that your Ethernet cable (if you're using one) is properly connected.
Challenge 2: Security Concerns
Security is always a concern when setting up a VPC network. Make sure you have strong passwords and enable two-factor authentication wherever possible. Regularly update your software to patch any security vulnerabilities.
Challenge 3: Performance Bottlenecks
Depending on the applications you're running, you might experience performance issues. If this happens, consider upgrading your Raspberry Pi to a more powerful model or optimizing your applications for better performance.
Real-World Raspberry Pi VPC Network Example
To give you a better idea of how a Raspberry Pi VPC network works in the real world, let's look at a practical example. Imagine you're running a small business and need a secure way to store and share files with your team. You can set up a Raspberry Pi VPC network to host a file server that only authorized team members can access.
Here's how it works:
- Set up your Raspberry Pi as the central server.
- Install and configure file-sharing software like Samba.
- Create user accounts for each team member and set appropriate permissions.
- Use OpenVPN to create a secure connection between your team's devices and the Raspberry Pi server.
Best Practices for Raspberry Pi VPC Network
Here are some best practices to keep in mind when setting up your Raspberry Pi VPC network:
Regular Backups
Always make sure to back up your data regularly. This will protect you in case of hardware failure or other issues.
Keep Software Updated
Regularly update your software to ensure that you have the latest security patches and features.
Monitor Network Traffic
Keep an eye on your network traffic to detect any unusual activity. This will help you identify and address security threats before they become serious problems.
Conclusion
And there you have it—your ultimate guide to setting up a Raspberry Pi VPC network example. By following the steps outlined in this article, you can create a secure and efficient cloud environment using nothing more than a Raspberry Pi and a little bit of know-how.
So what are you waiting for? Grab your Raspberry Pi, roll up your sleeves, and get started on your very own VPC network. And don't forget to share your experience with us in the comments below. Happy tinkering!
Table of Contents
- What Exactly is a Raspberry Pi VPC Network?
- Why Use Raspberry Pi for VPC?
- Getting Started with Raspberry Pi VPC Setup
- Step-by-Step Guide to Setting Up Raspberry Pi VPC Network Example
- Understanding VPC Network Architecture
- Common Challenges and How to Overcome Them
- Real-World Raspberry Pi VPC Network Example
- Best Practices for Raspberry Pi VPC Network
- Conclusion