Hey there, tech enthusiasts! If you're diving into the world of IoT and want to get your hands dirty with remote IoT device management, you're in the right place. Today, we’re talking about the remoteIoT device SSH tutorial, and trust me, this is going to be a game-changer for how you handle your gadgets from afar. Whether you're a seasoned pro or just starting out, SSH is one of those tools that can make your life so much easier.
SSH, or Secure Shell, is not just some random tech term—it’s your key to securely accessing and managing remote devices. Think of it like a secret passageway into your IoT setup without all the pesky risks of unauthorized access. It’s reliable, secure, and downright awesome when you know how to use it.
Now, before we dive deep into the nitty-gritty, let’s get one thing straight: managing remoteIoT devices via SSH isn’t as complicated as it sounds. With the right steps and a bit of practice, you’ll be controlling your IoT empire in no time. So, buckle up and let’s get started!
Read also:Unlocking The Secrets Of Fbsm Nyc Your Ultimate Guide To New Yorks Trendiest Scene
Table of Contents
- What is SSH and Why Does It Matter?
- Understanding RemoteIoT Basics
- Setting Up SSH for RemoteIoT Devices
- Securing Your SSH Connection
- Connecting to a RemoteIoT Device
- Advanced Features of SSH for IoT
- Troubleshooting Common SSH Issues
- Best Practices for Using SSH with IoT
- SSH vs Other Protocols for IoT
- The Future of RemoteIoT Management
What is SSH and Why Does It Matter?
Let’s break it down—SSH stands for Secure Shell, and it’s basically the superhero of remote connections. Instead of leaving your IoT devices exposed to the wild west of the internet, SSH wraps everything in a secure, encrypted package. This means you can control your devices from anywhere without worrying about hackers sniffing around.
Here’s why SSH matters: - Security: It encrypts all data exchanged between your computer and the remote device. - Reliability: SSH is rock-solid and works consistently across different platforms. - Flexibility: You can run commands, transfer files, and even set up tunnels for other services.
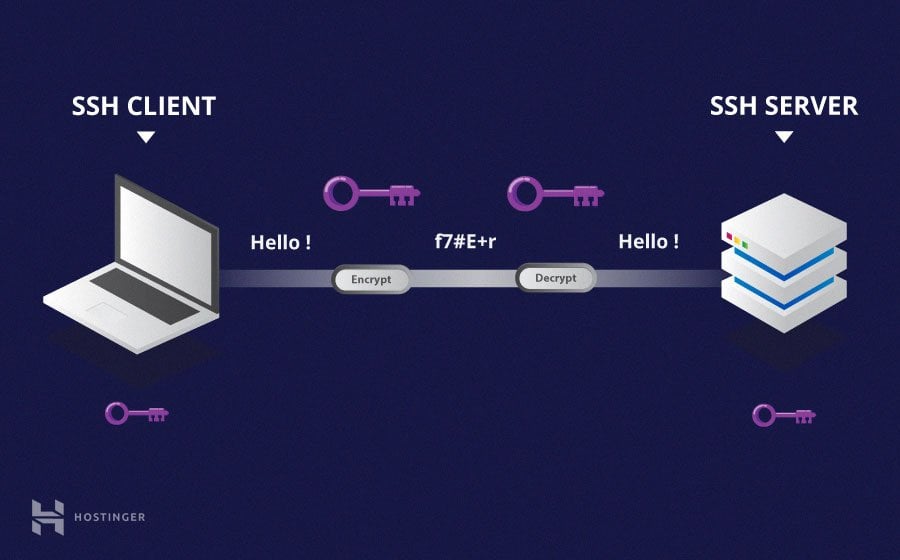
How SSH Works in a Nutshell
SSH operates on a client-server model. Your computer (the client) sends requests to the IoT device (the server), and the two communicate through an encrypted channel. This ensures that even if someone intercepts the data, they won’t be able to make sense of it.
Understanding RemoteIoT Basics
Before we jump into the SSH tutorial, let’s talk about what makes remoteIoT devices tick. These are basically gadgets like sensors, cameras, or smart home appliances that you can control from a distance. They’re connected to the internet, which opens up endless possibilities—but also some risks.
Here’s the deal: managing remoteIoT devices requires a solid understanding of networking, security, and troubleshooting. That’s where SSH comes in handy. It simplifies the process by giving you a secure way to interact with these devices.
Key Components of RemoteIoT Devices
- Hardware: The physical device itself, like a Raspberry Pi or ESP8266.
- Software: The operating system or firmware running on the device.
- Network: The connection method, whether it’s Wi-Fi, Ethernet, or cellular.
Setting Up SSH for RemoteIoT Devices
Alright, let’s get our hands dirty. Setting up SSH on a remoteIoT device isn’t rocket science, but it does require a few steps. First, you’ll need to ensure that SSH is enabled on the device. Most modern IoT platforms come with SSH pre-installed, but you might need to activate it manually.
Read also:Brandon Burlsworth Accident Who Was At Fault The Untold Story
Here’s how you do it:
- Access your IoT device’s settings (either physically or via a local network).
- Look for an option to enable SSH. It might be under "Advanced Settings" or "Security."
- Once enabled, note down the IP address of the device. You’ll need this later.
Tips for Smooth Setup
Pro tip: Always check the documentation for your specific IoT device. Some devices might require additional configurations, like generating SSH keys or setting up port forwarding on your router.
Securing Your SSH Connection
Security is a big deal when it comes to remoteIoT devices. Sure, SSH is secure by default, but there are extra steps you can take to beef up protection. For starters, avoid using weak passwords. Instead, consider setting up SSH key-based authentication.
Here’s how you can create SSH keys:
- Open your terminal or command prompt.
- Type
ssh-keygenand press Enter. - Follow the prompts to generate a public and private key pair.
- Copy the public key to your IoT device’s authorized_keys file.
Other Security Measures
- Change the default SSH port (usually 22) to something less obvious.
- Use a firewall to restrict access to the SSH port.
- Regularly update your IoT device’s firmware to patch vulnerabilities.
Connecting to a RemoteIoT Device
Now that everything is set up, it’s time to connect to your remoteIoT device. Open your terminal and type the following command:
ssh username@ip_address
Replace "username" with the actual username for your IoT device and "ip_address" with the device’s IP address. If you’re using key-based authentication, the terminal will automatically use your private key to log in.
Troubleshooting Connection Issues
If you run into problems, don’t panic. Here are a few common issues and their solutions:
- Error: Connection Refused – Double-check the IP address and ensure the device is online.
- Error: Permission Denied – Verify that your SSH keys are correctly configured.
- Error: Timeout – Check your network connection and ensure port forwarding is set up correctly.
Advanced Features of SSH for IoT
Once you’ve mastered the basics, it’s time to explore some advanced SSH features. One of the coolest things you can do is set up SSH tunnels. This allows you to securely access services on your IoT device, like a web server or database, without exposing them directly to the internet.
Another powerful feature is SCP (Secure Copy Protocol), which lets you transfer files between your computer and the IoT device. Just use the scp command followed by the file path and destination.
SSH Tunnel Example
Here’s how you can create an SSH tunnel:
ssh -L local_port:destination_host:destination_port username@ip_address
This command forwards traffic from your local machine to the destination host through the SSH connection.
Troubleshooting Common SSH Issues
Even the best-laid plans can go awry sometimes. If you encounter issues with SSH, here’s a checklist to help you troubleshoot:
- Check the device’s firewall settings to ensure SSH traffic is allowed.
- Verify that the SSH service is running on the IoT device.
- Test the connection using a different network or device.
If none of these work, consult the device’s documentation or reach out to the manufacturer’s support team.
Best Practices for Using SSH with IoT
Here are some best practices to keep in mind when working with SSH and remoteIoT devices:
- Always use strong, unique passwords or SSH keys.
- Limit the number of login attempts to prevent brute-force attacks.
- Regularly monitor your device’s logs for suspicious activity.
By following these guidelines, you’ll ensure that your IoT setup remains secure and reliable.
SSH vs Other Protocols for IoT
While SSH is a fantastic tool, it’s not the only option for managing remoteIoT devices. Other protocols like Telnet and FTP exist, but they lack the security features of SSH. Telnet, for example, transmits data in plain text, making it a no-go for sensitive applications.
FTP, on the other hand, is great for transferring files but lacks encryption. That’s why SSH is often the preferred choice for IoT enthusiasts who prioritize both functionality and security.
The Future of RemoteIoT Management
As IoT continues to evolve, so too will the tools we use to manage it. Expect to see advancements in SSH and other remote management protocols, with features like AI-driven threat detection and seamless integration with cloud platforms.
For now, mastering the remoteIoT device SSH tutorial is a great first step toward becoming a true IoT guru. Keep learning, experimenting, and most importantly, have fun!
Final Thoughts
Managing remoteIoT devices via SSH might seem intimidating at first, but with practice, it becomes second nature. Remember to prioritize security, stay updated on the latest trends, and never hesitate to ask for help when you need it.
Conclusion
We’ve covered a lot of ground today, from understanding the basics of SSH to exploring advanced features and troubleshooting tips. The remoteIoT device SSH tutorial is just the beginning of your journey into the exciting world of IoT. So, what are you waiting for? Grab your tools, fire up your terminal, and start tinkering!
And hey, don’t forget to leave a comment or share this article if you found it helpful. Your feedback means a lot, and it helps others discover this valuable resource. Happy hacking, my friend!