Imagine being able to control your smart home devices, monitor environmental conditions, or even automate industrial processes—all for free using a Raspberry Pi. Sounds too good to be true? Well, hold onto your hats, because this little computer packs a punch that’ll blow your mind. In today’s tech-savvy world, the Raspberry Pi has emerged as the go-to solution for DIY enthusiasts and professionals alike who want to dive into the realm of remote IoT without breaking the bank.
So, why is everyone talking about Raspberry Pi remote IoT? Well, it's not just about the affordability—it's also about the flexibility and scalability it offers. You can build anything from a simple weather station to a complex home automation system, all while leveraging the power of free software and open-source tools. This means you don’t have to spend a fortune on proprietary solutions.
In this article, we’ll take you on a journey through the best Raspberry Pi remote IoT setups that are completely free. We’ll cover everything from setting up your first project to optimizing your system for maximum efficiency. Whether you're a beginner or an advanced user, there’s something here for everyone. So, let’s dive in and unlock the potential of remote IoT with Raspberry Pi!
Read also:Inside The Imskirby Live Incident What Happened And Why It Matters
Here’s a quick roadmap to guide you through this article:
- What is Raspberry Pi Remote IoT?
- Benefits of Using Raspberry Pi for Remote IoT
- Getting Started with Raspberry Pi
- Free Software for Raspberry Pi IoT Projects
- Top Projects for Raspberry Pi Remote IoT
- Hardware Requirements for Your Projects
- Securing Your IoT Setup
- Troubleshooting Common Issues
- Real-World Applications of Raspberry Pi Remote IoT
- Conclusion and Next Steps
What is Raspberry Pi Remote IoT?
Let’s break it down. Raspberry Pi is a tiny but powerful single-board computer that’s been making waves in the tech community for years. When we talk about "remote IoT," we’re referring to the ability to control or monitor Internet of Things (IoT) devices from anywhere in the world. And the best part? You can do all of this for free using open-source software and a little bit of know-how.
The beauty of Raspberry Pi lies in its versatility. Whether you're building a smart irrigation system for your garden or creating a remote temperature monitoring solution for your business, the possibilities are endless. Plus, with the right setup, you can access your devices over the internet without needing to pay for expensive cloud services.
Why Choose Raspberry Pi for Remote IoT?
There are plenty of reasons why Raspberry Pi stands out in the world of remote IoT. First off, it’s incredibly affordable. You can get a Raspberry Pi for as little as $35, and that’s just the beginning. The community around Raspberry Pi is massive, which means you’ll have access to tons of tutorials, forums, and resources to help you along the way.
Plus, Raspberry Pi supports a wide range of programming languages and platforms, so you can choose the tools that work best for your project. Whether you’re a Python enthusiast or a fan of Node.js, you’ll find plenty of options to suit your needs.
Benefits of Using Raspberry Pi for Remote IoT
Okay, so we’ve established that Raspberry Pi is a great choice for remote IoT, but what exactly are the benefits? Let’s dive into the details:
Read also:Nagui Hikaru The Rising Star In The World Of Entertainment
- Affordability: As we mentioned earlier, Raspberry Pi is one of the most cost-effective solutions for IoT projects. You don’t need to invest in expensive hardware or software to get started.
- Flexibility: Raspberry Pi can be used for a wide range of applications, from simple home automation to complex industrial solutions. Its modular design makes it easy to adapt to different use cases.
- Community Support: The Raspberry Pi community is huge, and it’s filled with passionate developers and hobbyists who are more than happy to share their knowledge. This means you’ll never be stuck when you run into problems.
- Open-Source Software: With so many free and open-source tools available, you can build your projects without worrying about licensing fees or proprietary restrictions.
These benefits make Raspberry Pi an ideal choice for anyone looking to explore the world of remote IoT without spending a fortune.
Getting Started with Raspberry Pi
Ready to get your hands dirty? Let’s talk about how to get started with Raspberry Pi for remote IoT. First things first, you’ll need to set up your Raspberry Pi. This involves installing an operating system (OS) and configuring your hardware.
Step 1: Choose Your Operating System
There are several OS options for Raspberry Pi, but the most popular one is Raspberry Pi OS. It’s lightweight, easy to use, and comes pre-installed with a variety of tools and libraries that are perfect for IoT projects.
Other options include Ubuntu Server for Raspberry Pi, which is great for more advanced users, and DietPi, which is a lightweight alternative for those who want to maximize performance.
Step 2: Set Up Your Hardware
Once you’ve chosen your OS, it’s time to set up your hardware. Here’s what you’ll need:
- Raspberry Pi board (any model will do, but newer models like the Raspberry Pi 4 have better performance)
- MicroSD card (at least 16GB)
- Power supply (make sure it’s compatible with your Raspberry Pi model)
- Wi-Fi or Ethernet connection (depending on your setup)
With your hardware in place, you’re ready to move on to the next step.
Free Software for Raspberry Pi IoT Projects
Now that you’ve got your Raspberry Pi up and running, it’s time to talk about the software. Fortunately, there are tons of free and open-source tools available that make building IoT projects a breeze. Here are a few of our favorites:
1. Home Assistant
Home Assistant is a popular open-source platform for home automation. It allows you to control and monitor all your smart devices from a single interface. Plus, it’s completely free and runs seamlessly on Raspberry Pi.
2. Node-RED
Node-RED is a flow-based programming tool that makes it easy to connect different devices and services. It’s perfect for building complex IoT workflows without needing to write a ton of code.
3. Mosquitto
Mosquitto is an open-source MQTT broker that’s ideal for messaging between IoT devices. It’s lightweight, reliable, and works great with Raspberry Pi.
These tools, combined with the power of Raspberry Pi, give you everything you need to build amazing remote IoT projects.
Top Projects for Raspberry Pi Remote IoT
Alright, let’s talk projects. Here are some of the coolest Raspberry Pi remote IoT projects you can build for free:
1. Smart Home Automation
Use Home Assistant to control your lights, thermostats, and other smart devices from anywhere in the world. You can even set up automations to make your life easier.
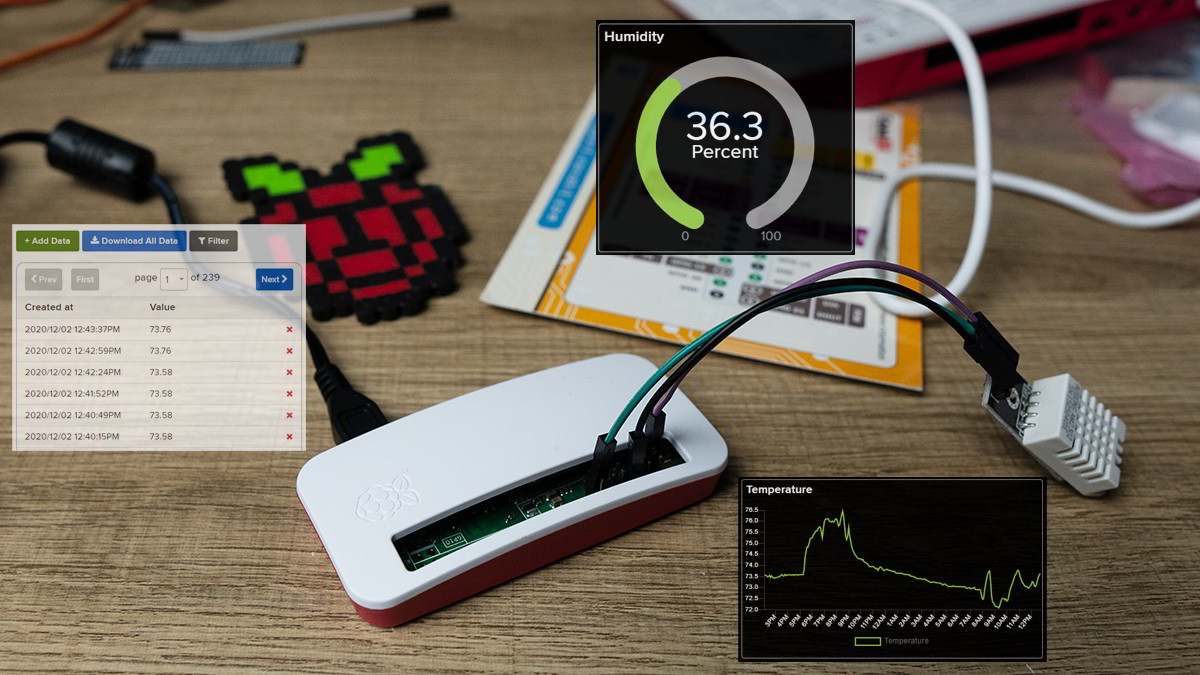
2. Weather Station
Build a weather station that monitors temperature, humidity, and other environmental conditions. You can display the data on a dashboard or send alerts when certain thresholds are reached.
3. Security Camera System
Turn your Raspberry Pi into a DIY security camera system. With a camera module and some free software, you can stream live video and record footage whenever motion is detected.
These projects are just the tip of the iceberg. With a little creativity and some free software, the sky’s the limit!
Hardware Requirements for Your Projects
Before you start building, it’s important to make sure you have the right hardware. Here’s a quick rundown of what you’ll need for some of the most popular Raspberry Pi remote IoT projects:
- Smart Home Automation: Raspberry Pi, Wi-Fi adapter, smart devices (e.g., lights, thermostats)
- Weather Station: Raspberry Pi, DHT22 sensor, breadboard, jumper wires
- Security Camera System: Raspberry Pi, camera module, motion detection software
Of course, the exact requirements will depend on the specifics of your project, but these should give you a good starting point.
Securing Your IoT Setup
Security is a big deal when it comes to remote IoT. After all, you don’t want someone hacking into your smart home or accessing your security camera footage. Here are a few tips to keep your setup safe:
- Use Strong Passwords: Make sure all your devices and services are protected with strong, unique passwords.
- Enable Firewall: Use a firewall to block unauthorized access to your Raspberry Pi.
- Keep Software Updated: Regularly update your OS and software to ensure you have the latest security patches.
By following these simple steps, you can help protect your IoT setup from potential threats.
Troubleshooting Common Issues
Even the best-laid plans can go awry sometimes. If you run into issues with your Raspberry Pi remote IoT setup, here are a few troubleshooting tips:
- Connection Problems: Check your Wi-Fi or Ethernet connection to make sure your Raspberry Pi is online.
- Software Errors: Make sure all your software is up to date and try rebooting your Raspberry Pi.
- Hardware Failures: If you suspect a hardware issue, try swapping out components to isolate the problem.
With a little patience and persistence, you’ll be able to resolve most issues on your own.
Real-World Applications of Raspberry Pi Remote IoT
So far, we’ve talked a lot about the possibilities of Raspberry Pi remote IoT, but what does it look like in the real world? Here are a few examples of how businesses and individuals are using Raspberry Pi to solve real-world problems:
1. Agriculture
Farmers are using Raspberry Pi to monitor soil moisture levels and automate irrigation systems, leading to more efficient water usage and higher crop yields.
2. Healthcare
Hospitals are leveraging Raspberry Pi to monitor patient vitals and alert staff when intervention is needed, improving patient care and reducing response times.
3. Education
Schools are incorporating Raspberry Pi into their curricula to teach students about programming, electronics, and IoT, preparing them for the jobs of the future.
These real-world applications demonstrate the incredible potential of Raspberry Pi remote IoT across a wide range of industries.
Conclusion and Next Steps
And there you have it—your ultimate guide to the best Raspberry Pi remote IoT setups that are completely free. From setting up your hardware to building amazing projects, we’ve covered everything you need to know to get started.
Remember, the key to success with Raspberry Pi remote IoT is experimentation. Don’t be afraid to try new things and push the boundaries of what’s possible. And if you run into problems, don’t worry—the Raspberry Pi community is here to help.
So, what are you waiting for? Grab your Raspberry Pi, fire up your favorite software, and start building your next big project. And don’t forget to share your experiences in the comments below—we’d love to hear about your journey!