When it comes to nail art, creativity knows no bounds. But have you ever thought about how much fun you can have with just one finger? One finger nail art designs might sound simple, but they pack a punch in terms of style and flair. Whether you're a beginner or a seasoned nail art enthusiast, this trend is all about making a statement without going overboard. So, let's dive into the world where minimalism meets maximum impact.
Now, you might be wondering, why focus on just one finger? Well, think of it as the cherry on top of your nail art sundae. It’s that little extra something that catches the eye and adds a personal touch to your overall look. Plus, it’s a great way to experiment with new techniques without committing to a full set of intricate designs.
In this article, we’ll explore everything you need to know about one finger nail art designs. From easy DIY ideas to professional tips and tricks, we’ve got you covered. So grab your favorite nail polish and let’s get started!
Read also:Sidereal Astrology Unlock The Secrets Of Your True Zodiac Sign
Why Choose One Finger Nail Art?
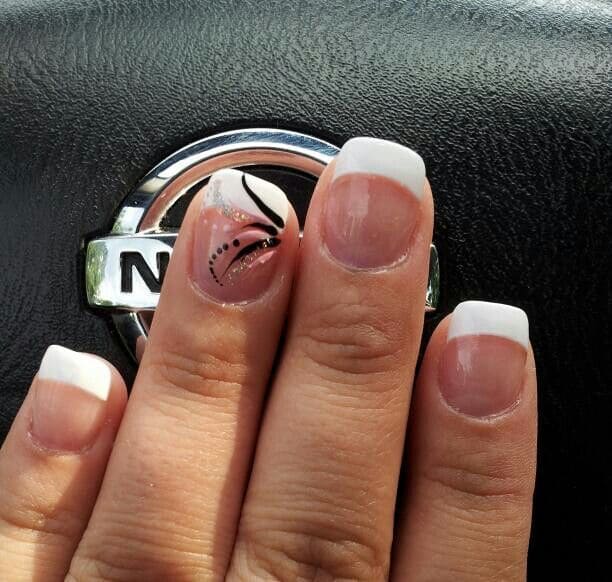
Choosing one finger for nail art might seem unconventional, but there’s a method to the madness. For starters, it’s a fantastic way to add a pop of color or pattern without overwhelming your look. Imagine rocking a sleek French manicure with a single finger sporting a bold geometric design—it’s the perfect blend of classic and edgy.
Another perk? It’s super versatile. Whether you’re dressing up for a fancy dinner or keeping it casual for everyday wear, one finger nail art can adapt to any occasion. Plus, it’s an excellent option if you’re short on time but still want to add a stylish twist to your nails.
Benefits of One Finger Nail Art
Let’s break down the benefits of this trendy nail art style:
- It’s quick and easy to do.
- You can experiment with bold colors and patterns without committing to a full set.
- It adds a unique touch to your overall aesthetic.
- Perfect for beginners who are just starting with nail art.
Getting Started: Tools and Materials
Before you dive into creating your one finger nail art masterpiece, it’s essential to gather the right tools and materials. Here’s what you’ll need:
- Base coat: Protects your nails and ensures a smooth surface for painting.
- Nail polish: Choose a variety of shades to play with.
- Detail brush: Essential for creating fine lines and intricate designs.
- Top coat: Seals your design and gives it a glossy finish.
- Stickers or stencils (optional): Great for beginners who want to achieve precise patterns.
Remember, quality matters. Investing in good-quality tools and materials will make a noticeable difference in the final result.
Popular One Finger Nail Art Designs
Now that you have your tools ready, let’s talk about some popular one finger nail art designs that are trending right now. From floral patterns to geometric shapes, there’s something for everyone.
Read also:Kyle Cheney And Liz Cheney The Family Connection You Need To Know
Floral Fantasy
Floral designs are timeless and versatile. You can go for a delicate daisy or a bold rose—it’s all about what suits your style. Use a fine brush to paint the petals and add tiny dots for the center. Don’t forget to layer your colors for depth and dimension.
Geometric Glamour
Geometric patterns are all about clean lines and sharp angles. Try creating a triangle or diamond shape on your chosen finger. For an extra pop, fill in the shapes with metallic shades or glitter polish. It’s a great way to add a modern touch to your nail art.
Step-by-Step Guide to Creating Your Own Design
Ready to create your own one finger nail art design? Follow these simple steps:
- Start with a clean base coat to protect your nails.
- Apply your base color of choice. Let it dry completely.
- Sketch your design lightly with a pencil (optional).
- Use a detail brush to paint your design, starting with the largest elements first.
- Add finishing touches, such as dots or lines, for added detail.
- Finish with a top coat to seal your design and give it a glossy finish.
Remember, practice makes perfect. Don’t be afraid to make mistakes—that’s part of the creative process!
Tips and Tricks for Beginners
If you’re new to nail art, here are some tips to help you get started:
- Start with simple designs and gradually work your way up to more complex patterns.
- Use stencils or stickers if you’re struggling with freehand painting.
- Practice on a piece of paper or nail art practice sheets before trying on your nails.
- Keep a lint-free wipe handy to clean up any mistakes.
Don’t forget to have fun! Nail art is all about expressing your creativity, so let your imagination run wild.
Professional Techniques for Advanced Artists
For those who want to take their one finger nail art to the next level, here are some professional techniques to try:
Water Marbling
Water marbling is a stunning technique that creates a marbled effect on your nails. All you need is a bowl of water, your chosen nail polish colors, and a toothpick. Drop the polish onto the water surface and swirl it with the toothpick to create your desired pattern. Dip your nail into the water, and voilà—you’ve got a unique design!
Stippling
Stippling involves using a sponge or brush to create tiny dots on your nails. This technique is perfect for adding texture and dimension to your design. Try stippling a gradient effect or creating a starry night sky on your chosen finger.
Where to Find Inspiration
Looking for inspiration for your one finger nail art designs? The internet is your oyster! Social media platforms like Pinterest and Instagram are treasure troves of creative ideas. Follow nail art influencers and join online communities to stay updated on the latest trends.
Don’t forget to check out tutorials on YouTube. Watching step-by-step videos can help you master new techniques and give you confidence to try them out yourself.
Common Mistakes to Avoid
Even the best nail artists make mistakes sometimes. Here are a few common pitfalls to watch out for:
- Not letting each layer dry completely before adding the next one.
- Using too much polish, which can lead to smudging.
- Skipping the base coat, which can cause your polish to chip more easily.
- Not using a top coat, which can dull your design and reduce its longevity.
By avoiding these mistakes, you’ll ensure your one finger nail art looks flawless every time.
Maintaining Your Nail Art
Once you’ve created your masterpiece, it’s important to take care of it so it lasts as long as possible. Here are some tips for maintaining your one finger nail art:
- Apply a fresh layer of top coat every few days to keep your design looking fresh.
- Avoid using harsh chemicals, such as acetone, which can damage your polish.
- Keep your nails clean and moisturized to prevent chipping.
With proper care, your one finger nail art can last for weeks, giving you plenty of time to enjoy your creation.
Conclusion: Make Your Mark with One Finger Nail Art
One finger nail art designs might seem small, but they make a big impact. Whether you’re a beginner or a pro, there’s something magical about creating a unique design on just one finger. From floral fantasies to geometric glamour, the possibilities are endless.
So, what are you waiting for? Grab your tools, unleash your creativity, and make your mark with one finger nail art. Don’t forget to share your creations with the world—tag us on social media so we can see your stunning designs!
Table of Contents:
- Why Choose One Finger Nail Art?
- Getting Started: Tools and Materials
- Popular One Finger Nail Art Designs
- Step-by-Step Guide to Creating Your Own Design
- Tips and Tricks for Beginners
- Professional Techniques for Advanced Artists
- Where to Find Inspiration
- Common Mistakes to Avoid
- Maintaining Your Nail Art
- Conclusion: Make Your Mark with One Finger Nail Art