Managing a Raspberry Pi remotely has become a game-changer for tech enthusiasts, hobbyists, and professionals alike. Imagine controlling your tiny powerhouse from anywhere in the world—whether you're monitoring a home automation system, running a media server, or deploying IoT applications. The possibilities are endless! This guide will walk you through the ins and outs of remote management, ensuring your Raspberry Pi stays connected, secure, and operational no matter where you are.
Remote management isn’t just about convenience; it’s about efficiency. Whether you’re troubleshooting issues, updating software, or deploying new configurations, doing it remotely saves time and effort. With the right tools and techniques, you can transform your Raspberry Pi into a reliable workhorse without ever needing to be physically present.
But wait—before we dive into the nitty-gritty, let’s make sure we’re on the same page. The Raspberry Pi is more than just a mini computer; it’s a versatile platform that can handle everything from simple tasks to complex applications. Managing it remotely requires a solid understanding of networking, security, and automation tools. Stick around, and I’ll break it all down for you!
Read also:Ronald Logan Delphi Indiana Unveiling The Truth Behind The Headlines
What You Need to Know About Managing Raspberry Pi Remotely
Managing a Raspberry Pi remotely isn’t rocket science, but it does require some groundwork. First things first, you need to ensure your Raspberry Pi is set up correctly and connected to the internet. This includes configuring Wi-Fi, assigning a static IP address, and enabling SSH (Secure Shell). These steps might sound intimidating, but trust me, they’re easier than you think.
Let’s talk about SSH for a moment. It’s like a secure tunnel that lets you access your Raspberry Pi from another device over the internet. Once SSH is enabled, you can use tools like PuTTY (for Windows users) or Terminal (for macOS and Linux users) to connect to your Pi. Simple, right? Well, not so fast. Security is paramount when managing devices remotely, so we’ll also cover how to secure your connection using SSH keys instead of passwords.
Another critical aspect is ensuring your Raspberry Pi remains accessible even if your home network changes. Dynamic DNS services can help here by providing a consistent address for your Pi, no matter what. We’ll explore popular options like No-IP and DuckDNS, so you never lose connection to your device.
Setting Up Your Raspberry Pi for Remote Access
Now that we’ve covered the basics, let’s get our hands dirty. The first step in managing your Raspberry Pi remotely is setting it up properly. Start by updating your operating system with the latest software packages. You don’t want to be halfway through a project only to find out there’s a critical bug fix waiting in the wings.
Next, enable SSH on your Raspberry Pi. If you’re running Raspberry Pi OS, this is as easy as going to the Preferences menu and selecting Raspberry Pi Configuration. From there, enable SSH under the Interfaces tab. For those who prefer the command line, you can achieve the same result by running sudo raspi-config and navigating to the appropriate option.
Once SSH is enabled, test your connection locally to ensure everything works as expected. Open a terminal window on your computer and type ssh pi@your-pi-ip-address. If you see the login prompt, congratulations—you’re ready to move on to the next step!
Read also:Who Is Terri Clarks Partner Unveiling The Life And Love Of A Country Music Icon
Securing Your Remote Connection
Security should always be at the forefront of your mind when managing devices remotely. Using a password for SSH access is convenient, but it’s also vulnerable to brute-force attacks. A better approach is to use SSH keys, which provide a higher level of security.
To generate an SSH key pair, open a terminal on your computer and run ssh-keygen. Follow the prompts to create a public and private key. Once generated, copy the public key to your Raspberry Pi by running ssh-copy-id pi@your-pi-ip-address. Now, when you connect to your Pi, you’ll use the private key instead of a password.
For extra protection, consider disabling password authentication altogether. Edit the SSH configuration file (/etc/ssh/sshd_config) and set PasswordAuthentication no. Restart the SSH service, and voilà—your connection is now more secure than ever!
Understanding Network Configuration for Remote Management
Network configuration plays a crucial role in managing your Raspberry Pi remotely. By default, most home routers assign dynamic IP addresses to connected devices. This means your Raspberry Pi’s IP address could change every time you restart your router. To avoid this headache, assign a static IP address to your Pi.
There are two ways to do this: via your router’s admin interface or by modifying the Pi’s network settings. The former is often easier, as you simply reserve an IP address for your Pi’s MAC address. However, if you prefer the DIY route, edit the /etc/dhcpcd.conf file and add the following lines:
- interface eth0
- static ip_address=192.168.1.100/24
- static routers=192.168.1.1
- static domain_name_servers=192.168.1.1
Restart your Pi, and it should now have a fixed IP address. This makes connecting to your Pi much simpler, especially when using SSH or other remote tools.
Dealing with Dynamic IP Addresses
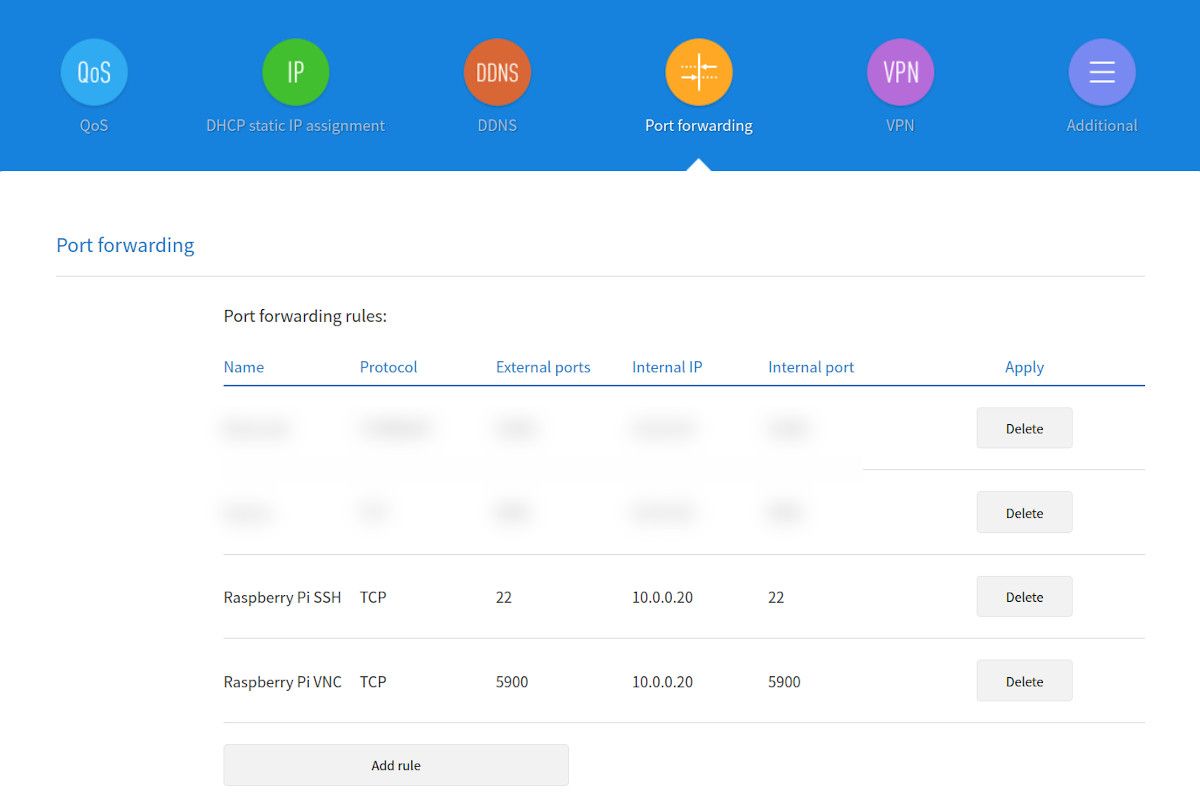
Even with a static IP address, your Raspberry Pi might still be unreachable if your home network’s public IP address changes. This is where Dynamic DNS (DDNS) comes in. DDNS services automatically update your domain name to point to your current IP address, ensuring you can always reach your Pi.
Popular DDNS providers include No-IP, DuckDNS, and Dynu. Most of these services offer free plans that are perfect for hobbyists. Simply sign up, create a hostname, and configure your router or Pi to update the service whenever your IP changes. With DDNS in place, you’ll never have to worry about losing connection to your device again.
Tools for Managing Raspberry Pi Remotely
When it comes to managing Raspberry Pi remotely, having the right tools can make all the difference. Here’s a list of must-have tools that will simplify your workflow:
- SSH Clients: PuTTY (Windows), Terminal (macOS/Linux)
- File Transfer: SCP, WinSCP
- Remote Desktop: VNC Viewer, RealVNC
- Monitoring: htop, Glances
- Automation: Ansible, Docker
Each tool serves a specific purpose, so choose wisely based on your needs. For example, if you need to transfer files between your computer and Raspberry Pi, SCP or WinSCP is the way to go. On the other hand, if you want to monitor system performance, htop or Glances will give you real-time insights into CPU, memory, and disk usage.
Automating Tasks with Scripts
Automation is key to efficient remote management. By writing scripts, you can automate repetitive tasks like backups, updates, and reboots. Bash scripting is a great place to start, as it’s simple yet powerful.
For instance, here’s a basic script to back up your Raspberry Pi’s SD card:
- #!/bin/bash
- sudo dd if=/dev/mmcblk0 of=/path/to/backup.img bs=4M
Save this script as backup.sh, make it executable with chmod +x backup.sh, and run it whenever you need to create a backup. You can also schedule it to run automatically using cron jobs. Automation not only saves time but also reduces the risk of human error.
Best Practices for Secure Remote Management
Security should never be an afterthought when managing Raspberry Pi remotely. Follow these best practices to keep your device safe:
- Use SSH keys instead of passwords
- Disable root login via SSH
- Change the default SSH port (22) to something less obvious
- Install a firewall to block unauthorized access
- Regularly update your operating system and software
One often-overlooked security measure is changing the default SSH port. Hackers frequently scan for devices listening on port 22, so moving your SSH service to a different port can deter casual attackers. To do this, edit the /etc/ssh/sshd_config file and set Port 2222 (or any other unused port). Don’t forget to update your firewall rules accordingly.
Monitoring and Logging
Monitoring your Raspberry Pi’s activity is essential for detecting potential security threats. Use tools like fail2ban to block repeated login attempts and logwatch to generate daily reports on system activity. These tools can help you stay one step ahead of attackers and ensure your Pi remains secure.
Advanced Techniques for Remote Management
Once you’ve mastered the basics, it’s time to explore advanced techniques for managing Raspberry Pi remotely. One such technique is setting up a reverse SSH tunnel. This allows you to connect to your Pi even if it’s behind a firewall or NAT.
Here’s how it works: From your Raspberry Pi, establish a reverse SSH connection to a remote server that you control. Then, from your computer, connect to the remote server and tunnel through to your Pi. This method is particularly useful if you’re managing multiple Raspberry Pis across different networks.
Using Docker for Containerization
Docker is another powerful tool for remote management. By containerizing your applications, you can ensure consistency across different environments and simplify deployment. Docker also makes it easier to update and rollback changes, reducing the risk of downtime.
To get started with Docker, install it on your Raspberry Pi by running curl -fsSL https://get.docker.com -o get-docker.sh followed by sudo sh get-docker.sh. Once installed, you can pull pre-built images from Docker Hub or create your own custom containers.
Troubleshooting Common Issues
Even with the best setup, things can go wrong. Here are some common issues you might encounter when managing Raspberry Pi remotely and how to fix them:
- Unable to Connect via SSH: Check your IP address, firewall rules, and SSH configuration.
- Slow Connection: Optimize your network settings or switch to a wired connection if possible.
- Lost DDNS Updates: Verify your DDNS client is running and configured correctly.
If all else fails, reboot your Raspberry Pi and try again. Sometimes, the simplest solutions are the most effective!
Staying Up-to-Date
The world of technology is constantly evolving, and so is the Raspberry Pi ecosystem. Stay informed by following official Raspberry Pi blogs, forums, and social media channels. Joining online communities can also provide valuable insights and support from fellow enthusiasts.
Conclusion: Take Control of Your Raspberry Pi Anywhere
In this guide, we’ve covered everything you need to know about managing Raspberry Pi remotely. From setting up SSH and configuring your network to securing your connection and automating tasks, you now have the tools and knowledge to take full control of your device from anywhere in the world.
Remember, remote management is all about efficiency and security. By following best practices and staying up-to-date with the latest trends, you can ensure your Raspberry Pi remains a reliable and versatile tool for all your projects.
So, what are you waiting for? Grab your Raspberry Pi, roll up your sleeves, and start exploring the endless possibilities of remote management. And don’t forget to share your experiences and tips in the comments below!
Table of Contents
- What You Need to Know About Managing Raspberry Pi Remotely
- Setting Up Your Raspberry Pi for Remote Access
- Securing Your Remote Connection
- Understanding Network Configuration for Remote Management
- Tools for Managing Raspberry Pi Remotely
- Automating Tasks with Scripts
- Best Practices for Secure Remote Management
- Monitoring and Logging
- Advanced Techniques for Remote Management
- Using Docker for Containerization
- Troubleshooting Common Issues